5.4 KiB
BITE - A Basic/IoT/Example
Playing with IoT


This project is for educational purposes only. It does not implement any authentication and/or encryption protocol, so it is not suitable for real production.
Installation
Requirements
docker-ceormobydocker-compose
The project is compatible with Docker for Windows (using Linux executors), but it is advised to directly use a minimal Linux VM instead (via the preferred hypervisor).
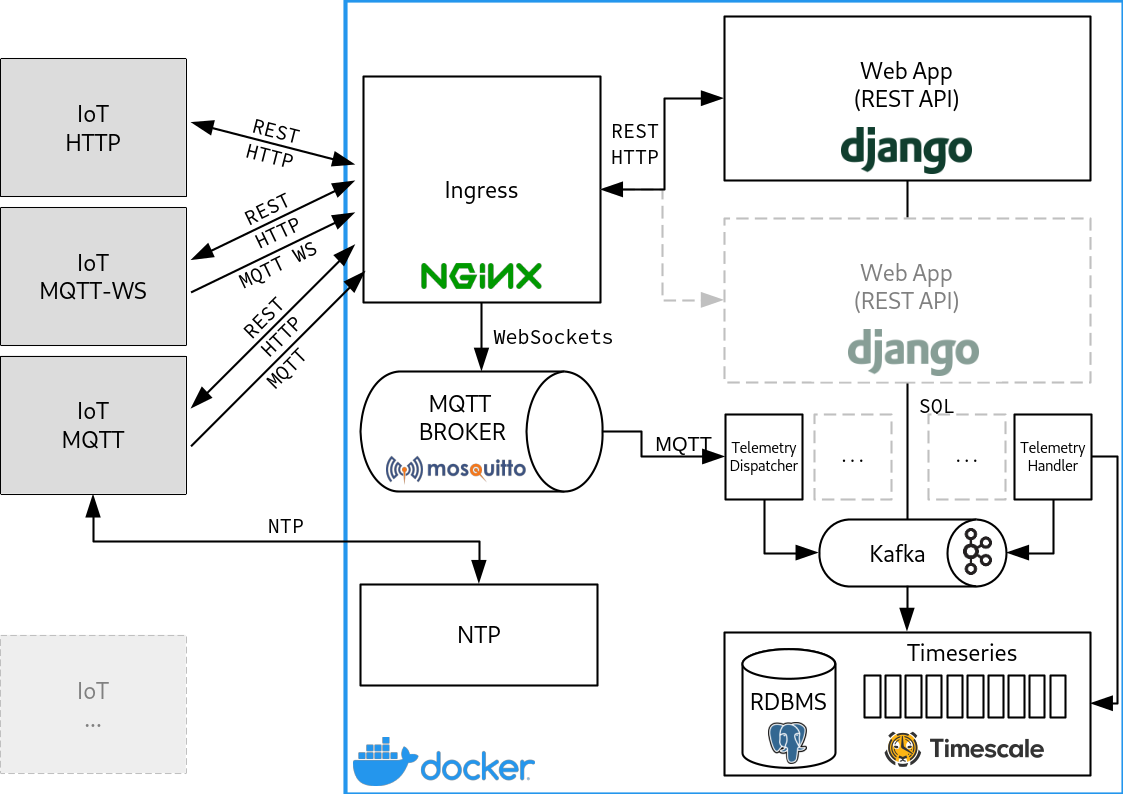
The application stack is composed by the following components:
- Django with
Django REST framework
web application (running via
gunicornin production mode)dispatchercustom daemon to dump telemetry into the Kafka queuehandlercustom daemon to dump telemetry into the timeseries database from the Kafka queue- telemetry payload is stored as json object (via PostgreSQL JSON data type)
- Kafka broker
- Timescale DB, a PostgreSQL database with a timeseries extension
- Mosquitto MQTT broker (see alternatives below)
- Nginx as ingress for HTTP (see alternative below)
- Chrony as NTP server
(with optional
MD5encryption)
Deployment
The $CUSTOM_DOCKER_IP environment variable can be used to set a custom
IP address to bind ports. Default is 0.0.0.0; 127.0.0.1 is a
safe configuration (see https://github.com/docker/compose/issues/2999).
Development, using image code
docker-compose -f docker/docker-compose.yml build
docker-compose -f docker/docker-compose.yml up -d [--scale {bite,dispatcher)=N]
It exposes:
http://localhost:80(HTTP and MQTT over Websockets)tcp://localhost:1883(MQTT)udp://localhost:123(NTP)
Django runs with DEBUG = True and SKIP_WHITELIST = True
Development with direct access to services and autoreload
docker-compose -f docker/docker-compose.yml -f docker-compose.dev.yml up -d [--scale {bite,mqtt-to-db)=N]
It exposes:
http://localhost:80(HTTP and MQTT over Websockets)http://localhost:8080(Django'srunserver)tcp://localhost:1883(MQTT via Nginx streams)tcp://localhost:18883(MQTT via Mosquitto)tcp://localhost:9001(MQTT over Websockets via Mosquitto)tcp://localhost:29092(Kafka)udp://localhost:123(NTP)tcp://localhost:5432(PostgreSQL/Timescale)
Django runs with DEBUG = True and SKIP_WHITELIST = True
Production (kind of...)
docker-compose -f docker/docker-compose.yml -f docker-compose.prod.yml up -d [--scale {bite,mqtt-to-db)=N]
It exposes:
http://localhost:80(HTTP and MQTT over Websockets)tcp://localhost:1883(MQTT)udp://localhost:123(NTP)
Django runs with DEBUG = False and SKIP_WHITELIST = False
Extra features
The project provides multiple modules that can be combined with the fore-mentioned configurations.
VerneMQ
A ~8x memory usage can be expected compared to Mosquitto.
To use VerneMQ instead of Mosquitto run:
docker-compose -f docker/docker-compose.yml up -f docker/mqtt/docker-compose.vernemq.yml -d
RabbitMQ
RabbitMQ does provide AMQP protocol too, but ingestion on the application side is not implemented yet. A ~10x memory usage can be expected compared to Mosquitto.
To use RabbitMQ (with the MQTT plugin enabled) instead of Mosquitto run:
docker-compose -f docker/docker-compose.yml up -f docker/mqtt/docker-compose.rabbitmq.yml -d
EDGE gateway simulation (via dind)
An EDGE gateway, with containers as modules, may be simulated via dind (docker-in-docker).
Start the EDGE
docker-compose -f docker/docker-compose.yml up -f docker/edge/docker-compose.edge.yml -d
Run the modules inside the EDGE
DOCKER_HOST='127.0.0.1:22375' docker-compose -f docker-compose.modules.yml up -d [--scale {device-http,device-ws,device-mqtt}=N]
Arduino
A simple Arduino UNO sketch is provided in the arduino/tempLightSensor folder.
The sketch reads temperature and light from sensors.
/* ... */

void loop(void) {
  const int postDelay = TELEMETRY_DELAY * 1000;

  unsigned int tempReading = analogRead(A0);
  unsigned int photocellReading = analogRead(A1);

  float tempVoltage = tempReading * AREF_VOLTAGE / 1024.0;
  float tempC = (tempVoltage - 0.5) * 100 ;

  if (NTPValid) {
    telemetry["clock"] = timeClient.getEpochTime();
  } else {
    telemetry["clock"] = NULL; // converted into 0
  }
  payload["light"] = photocellReading;

  temp["celsius"] = tempC;
  temp["raw"] = tempReading;
  temp["volts"] = tempVoltage;

#if USE_MQTT
  publishData(config, telemetry);
#else
  postData(config, telemetryURL, telemetry);
#endif

/* ... */
Testing
Application tests are part of the Django suite:
python manage.py test
End-to-End tests are performed via Travis-CI. See .travis.yml
for further explanations.